You are here:

Change detector

Overview

Picterra provides two pathways for change detection:


Change detection model

This approach allows you to annotate changes directly across combined “before” and “after” images and train the model with combined image pair and change annotations. You can focus on specific types of changes, like a building’s construction phase, and train a machine learning model based on these annotations. This method is more flexible and can also be more efficient, as it runs a single model on a pair of images.
Find out more

Comparative analysis

This method involves comparing objects or textures in two images taken at different times. It identifies changes based on the presence or absence of these features between the “before” and “after” images. This approach is particularly effective when you need high accuracy and reliable image detection, but it doesn’t account for changes in appearance. It’s a geometry-based comparison, meaning it doesn’t rely on machine learning.
Find out more

Change detection model

This approach allows you to create a dedicated change detection model to identify changes between two images taken at different times. For example, it can detect appearing or disappearing objects or land cover changes. You can focus on specific changes, like a building’s construction phase, and train a machine learning model based on these annotations. This method is more flexible and efficient, as it uses a single model to analyze a pair of images.

How it works

Change detection process

Training a change detector

Upload your imagery

To create a change detector you will require at least two images of different time frames, which should cover the same geographical location and have the same number of bands.

Create a change detector

To create a new change detector, click on the blue “Create a Detector” button at the top left corner of the Detectors page. In the pop-up window name your detector, select the detection type and tick the "Change Mode" option. This activates an automated UI and detector settings specifically designed for creating change detectors. Since the training dataset for change detectors is always based on pairs of images, you cannot convert a change detector into a regular detector, and vice versa. Therefore, please be aware that this setting cannot be changed later.

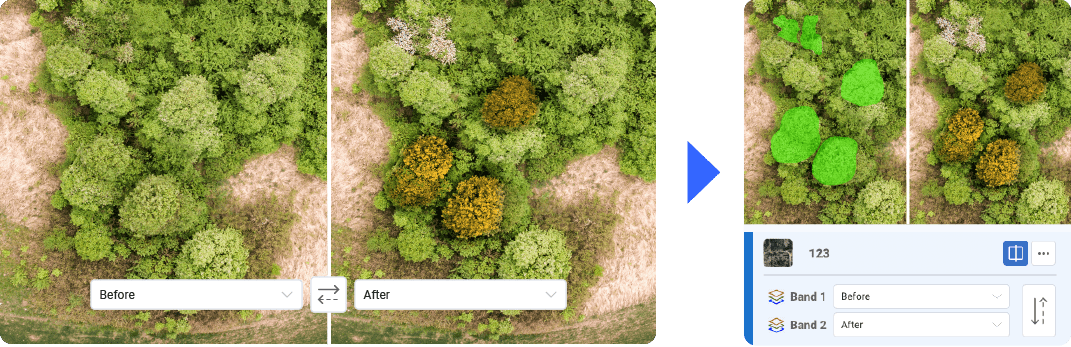
Select a pair of images

This type of detector utilizes the Split View as default interface, displaying the two images side by side. Use the drop-downs at the bottom-center of the screen to select an image for each side, ensuring that the left side reflects a more recent state than the right side. The annotations you draw will be assigned to this pair of images, which the detector will use to learn what you mean by "changes."
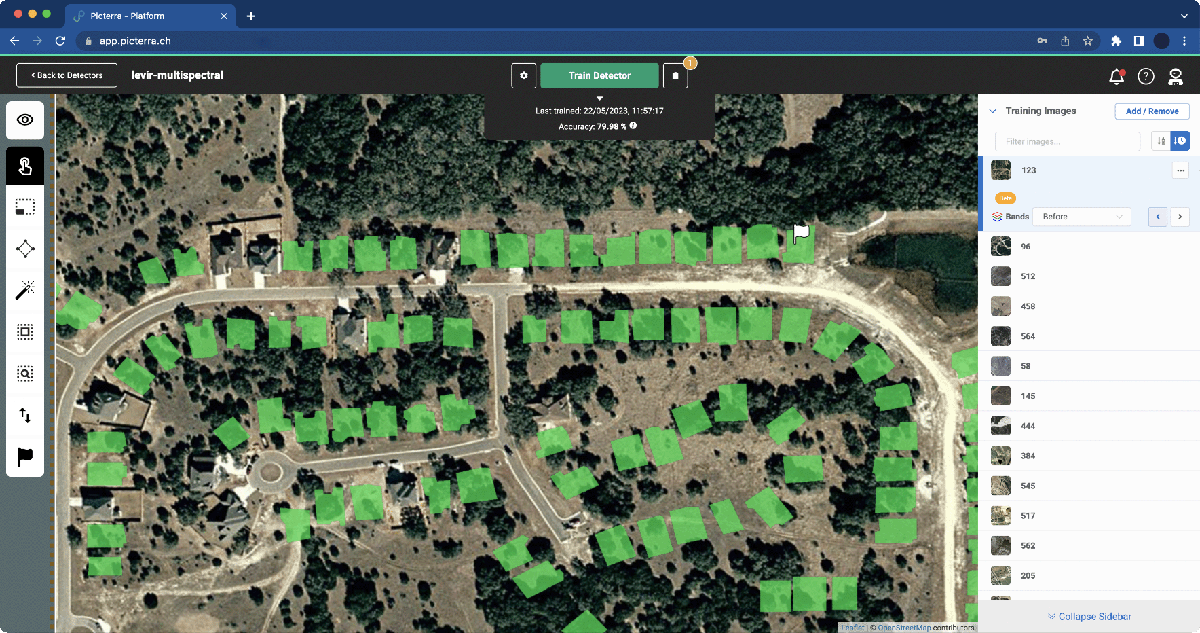
Annotate changes

Next, you need to teach your detector what a change is. Outline on your imagery the objects of interest, and how it has changed. Only the annotations assigned to both images active in the view will be shown. Use the training areas panel to browse your annotations easily.

When annotating, pay particular attention to ensuring the left-side image is always more recent than the right-side one. Detectors will not learn the same thing when shown an appearing or disappearing object. To avoid mistakes, ensure your images’ capture dates are accurate; you can adjust these in the Image Details dialog.

Please note, that you can annotate as many pairs of images as you want and your detector will be trained considering all of the annotations in the detector.

Run a change detector

Training a change detector requires annotations drawn on pairs of images, and running change detectors also requires a pair of images. The output of a change detector is a vector layer that represents the instances of the changes it was trained to recognize.

Best practices: Be sure to set up detection areas to help keep the detection time low, considering the increased data processing required by using two images instead of one.

Select your images

Similarly to the annotation process, make sure to run the detector on the most recent image of the pair, and select the older image as the second image. The output detections will be attached to the most recent image.

View and manage your results

Running the detector will generate a new “change detection layer”. This layer is linked to a pair of images and is distinguished by an icon next to its name. By selecting the icon, you can preview both images associated with that specific layer in a split view. Results can be managed and edited as usual.

Activate/Deactivate split view

The split view can be activated and deactivated using the dedicated icon in the toolbar on the left side.

Change detection features

Remote imagery

Change detectors can be trained and run on remote imagery. This follows the regular process for remote imagery servers. The only difference is that you will need one server for each capture date:

  • Make sure you have setup at least 2 remote imagery servers in the Imagery Servers list (or more: there should be one for each date of interest)
  • Import your AOI (once for each date), either in streaming mode or in download mode (streaming will be quicker!)
  • Add the imported remote imagery to your detector, then annotate changes as if those were regular images.

When done annotating and training your detector, you can run it on your imported images. This is no different to running a change detector.

Comparative analysis

This approach works best when image detections are accurate, and if it involves detections of objects disappearing, appearing, or moving.

1. Detect in “before” and “after” images

To compare two images, we detect objects/textures in both the “before” and “after” images and compare them. If an object disappears in the second image, it counts as a disappearance, and if an object appears in the second image, it counts as an appearance. For moving objects, we determine if something has moved based on the overlap between the locations of the two objects. Note that this means the object is shifting / rotating slightly such that there is still overlap between the detection on the “before” and “after” images so that we can still match the object (If it moves too much it could look like one object appearing and another disappearing)

2. Compare detections

In a second step, the detections from the “before” and “after” image are used to identify disappearances, appearances or moving objects. This identification happens by feeding the “before” and “after” image to an Advanced Tool. Note that the Advanced Tool for comparative change detection analysis is not available by default, but can be enabled on your account on request.

3. Change alerts dashboard (optional)

Contact your customer success representative to discuss options for a custom dashboard which allows manual review of automatically detected changes.

Change detection

Picterra provides two pathways for change detection:


Change detection model

This approach allows you to annotate changes directly across combined “before” and “after” images and train the model with combined image pair and change annotations. You can focus on specific types of changes, like a building’s construction phase, and train a machine learning model based on these annotations. This method is more flexible and can also be more efficient, as it runs a single model on a pair of images.
Find out more

Comparative analysis

This method involves comparing objects or textures in two images taken at different times. It identifies changes based on the presence or absence of these features between the “before” and “after” images. This approach is particularly effective when you need high accuracy and reliable image detection, but it doesn’t account for changes in appearance. It’s a geometry-based comparison, meaning it doesn’t rely on machine learning.
Find out more

Comparative analysis

This approach works best when image detections are accurate, and if it involves detections of objects disappearing, appearing, or moving.

1. Detect in “before” and “after” images

To compare two images, we detect objects/textures in both the “before” and “after” images and compare them. If an object disappears in the second image, it counts as a disappearance, and if an object appears in the second image, it counts as an appearance. For moving objects, we determine if something has moved based on the overlap between the locations of the two objects. Note that this means the object is shifting / rotating slightly such that there is still overlap between the detection on the “before” and “after” images so that we can still match the object (If it moves too much it could look like one object appearing and another disappearing)

2. Compare detections

In a second step, the detections from the “before” and “after” image are used to identify disappearances, appearances or moving objects. This identification happens by feeding the “before” and “after” image to an Advanced Tool. Note that the Advanced Tool for comparative change detection analysis is not available by default, but can be enabled on your account on request.

3. Change alerts dashboard (optional)

Contact your customer success representative to discuss options for a custom dashboard which allows manual review of automatically detected changes.

Change detection model

1. Combine “before” and “after” images

Use the Format images for change detection Advanced Tool to create a “change” image that can be used to train your detector. This will require two images, which should cover the same geographical location and have the same number of bands.


Contact your customer success representative to enable this Advanced tool if you don’t have it available yet.

2. Set up band settings

Open the added image and hit the Edit bands button. This will open the multispectral dialog in which you should edit the band settings for each image.

A typical change detection setup would have 2 band settings per image:

  • “before” using bands 1, 2 and 3
  • “after” using bands 4, 5 and 6

After doing this for every training image, you are ready for the next steps.

3. Labelling & Training

The annotation process is similar to the usual detector training flow. Note however, that only changes should be annotated.

For instance, if you are interested in buildings that were built between two dates, do not annotate all buildings, but only those buildings that aren’t there when viewing the “before” bands and appear when viewing the “after” bands. The model will learn to identify differences that are similar to the ones you annotate.

Band settings display options

There are multiple ways to configure which bands are displayed:

Enabling spit screen

in the imagery panel on the top right corner, selecting the split screen icon you will enable the slit screen view.

Band selection

With split view enabled: you can select bands that are displayed on each side of the “split” screen. You are able to select them on the image tab, or directly in the middle of the split view.

4. Running the detector

Once the change detector has been trained, it can be run on more images just like any other detector, see Generate Results section for more information.